The IBM Netezza system has four user priority levels for session query and execution. Other two more priorities are for system resources. In this article, we will check on how to change Netezza user query priority with syntax and examples.
Netezza Priority Levels
Below table describe the Netezza user priority levels:
| Name | Description |
| Critical | Highest priority user |
| High | Priority user job. The high priority jobs takes precedence’s over normal jobs |
| Normal | Default priority level for all jobs |
| Low | Lowest priority user jobs |
Change Priority of Jobs in a Session
You can use the nzsession priority command or ALTER SESSION command to change the priority for all jobs for that session. The system will change the priority to all current and new jobs in that particular session.
Read:
- Optimize Netezza Table Structure to Improve Performance
- nzsession command: How to Manage Netezza sessions
- Netezza create user commands and Examples
Change priority of a session using nzsession priority command:
nzsession priority -high -u user -pw password -id 12345
Change priority of a session using ALTER SESSION command:
TRAINING.ADMIN(ADMIN)=> ALTER SESSION 12345 SET PRIORITY TO HIGH;
ALTER SESSION
You may or may not specify the session ID. By default, system considers current session.
Change Priority Level for User
You can define the default and maximum priority level for a user, a group, or as the system default. System will uses the new values when user connects to the host and runs Netezza SQL commands.
Read: Netezza nzsql commands and its Usage
The syntax to modify the priority for a user:
ALTER USER vithal WITH DEFPRIORITY LOW MAXPRIORITY HIGH;
Change Priority Level for User Session Using nzadmin tool
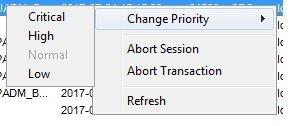
You can change the priority level for the user session using nzadmin tool. This is the easiest way to change Netezza user query priority. Just right click on the active session and change the priority.
Below image explains the change process and available priority levels.
